-
UIButton 커스텀(Image & Title)iOS 2023. 2. 1. 20:08
lazy var okButton: UIButton = {
    let button = UIButton(type: .custom)
    button.translatesAutoresizingMaskIntoConstraints = false
    button.layer.cornerRadius = 8
    button.backgroundColor = .systemGreen
    button.setTitle("OK", for: .normal) // Title
    button.titleLabel?.font = .systemFont(ofSize: 20)
    button.setImage(UIImage(systemName: "checkmark.circle"), for: .normal) // Image
    button.addTarget(self, action: #selector(touchUpOkButton), for: .touchUpInside)
    return button
}()

lazy var cancelButton: UIButton = {
    let button = UIButton(type: .custom)
    button.translatesAutoresizingMaskIntoConstraints = false
    button.layer.cornerRadius = 8
    button.backgroundColor = .systemRed
    button.setTitle("Cancel", for: .normal)
    button.titleLabel?.font = .systemFont(ofSize: 20)
    button.setImage(UIImage(systemName: "x.circle"), for: .normal)
    button.addTarget(self, action: #selector(touchUpCancelButton), for: .touchUpInside)
    return button
}()
기본적으로 위와 같이 Title과 Image를 같이 설정해주면, 아래와 같이 타이틀 왼쪽에 사진이 추가됩니다.

이는 왼쪽에서 오른쪽으로 읽는 문화권에 해당되는 내용이며, 따라서 semanticContentAttribute 프로퍼티를 이용해서 속임수를 쓸 수 있습니다.
func configureButton() {
    okButton.semanticContentAttribute = .forceRightToLeft
    cancelButton.semanticContentAttribute = .forceRightToLeft
}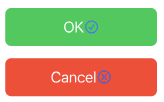
다음으로, UIButton.Configuration.imagePlacement를 사용해서 변경할 수도 있습니다. Configuration으로 만든 후, 기존의 버튼 프로퍼티를 활용해도 됩니다.
lazy var configurationButton: UIButton = {
    let button = createConfigurationButton()
    button.translatesAutoresizingMaskIntoConstraints = false
    button.layer.cornerRadius = 8
    button.backgroundColor = .systemMint
    button.addTarget(self, action: #selector(touchUpConfigurationButton), for: .touchUpInside)
    return button
}()

func createConfigurationButton() -> UIButton {
    // Title
    var container = AttributeContainer()
    container.font = UIFont.systemFont(ofSize: 20)

    var configuration = UIButton.Configuration.plain()
    configuration.attributedTitle = AttributedString("Configuration", attributes: container)
    // Image
    configuration.image = UIImage(systemName: "pencil")
    configuration.imagePlacement = .trailing
    configuration.imagePadding = 8 // 패딩

    return UIButton(configuration: configuration)
}
마지막으로, 다음과 같이 UIButton의 titleLabel을 기준으로 원하는 위치에 이미지를 둘 수도 있습니다. 상속(UIView --> UIControl --> UIButton)이 이루어지기 때문에 가능한 방법입니다.
extension UIButton {
    func createRightImage(_ image: UIImage?) {
        let imageView = UIImageView(image: image)
        imageView.translatesAutoresizingMaskIntoConstraints = false

        addSubview(imageView)

        NSLayoutConstraint.activate([
            imageView.trailingAnchor.constraint(equalTo: trailingAnchor, constant: -20),
            imageView.centerYAnchor.constraint(equalTo: titleLabel!.centerYAnchor),
            imageView.widthAnchor.constraint(equalToConstant: 40),
            imageView.heightAnchor.constraint(equalToConstant: 40)
        ])
    }
}
코드
github
참고
(https://sarunw.com/posts/how-to-position-uibutton-image-to-th-right-side-of-text.md/)
'iOS' 카테고리의 다른 글
Swift Package에 GitHub Actions 사용하기 (0) 2023.05.05 Class와 Performance in Swift (0) 2023.02.02 UIKit에서 SwiftUI View 활용하기 (0) 2023.01.02 Actor in Swift concurrency (0) 2022.12.31 Diffable DataSource (2) 2022.12.29